Open Source Photo Editing
Back in 2014, when I first bought my camera, I was told that I should buy Adobe Photoshop or Lightroom to edit my images which, in fact, would have meant going through the hassle of installing and using Windows on my Computer. I was reluctant to do so and really liked my Linux. Hence, I started using GIMP and later Darktable (and rarely Qtpfsgui for HDRs). Until now, I still have never used Photoshop or Lightroom for image editing and do not see the need to do so.
This tutorial is not complete. It is meant as a motivation, showing that it is possible to live without the software counterparts that only work on Windows or Mac. I will present a few common techniques when editing images to give you a starting point if you are beginning with photography or want to switch from proprietary software. Later, I will provide additional tips and further reading.
Lens correction
Once you shot the image, you often want to do lens correction to mitigate chromatic aberrations and barrel distortion. The program for doing that is Darktable. It is the open source equivalent of Adobe Lightroom. Unlike GIMP, it can deal with raw images. Furthermore, it is more specific to photo editing, not general image editing.
Your lens has to be in the database of Darktable for the lens correction. The program can detect your lens if you are using a common DSLR lens. If it is not detected, you may be able to select it manually. The rest is fairly easy: You open the image with Darktable. On the top right, you will find the tabs:
![]()
Select darkroom. Below the histogram appearing top right, you will find this menu:
![]()
Click on the button with the tool tip correction group. In the menu below, find lens correction and enable it by clicking on the small on-off button:
![]()
Especially with cheaper lenses, you will notice a clear difference in the preview of the image. Now you can go to the lighttable tab where your image should already be marked. On the right, you will find export selected and click export. You can find your corrected image in a folder darktable_exported besides the original image. An example with original (left) and mitigated chromatic aberration (right) can be seen here:

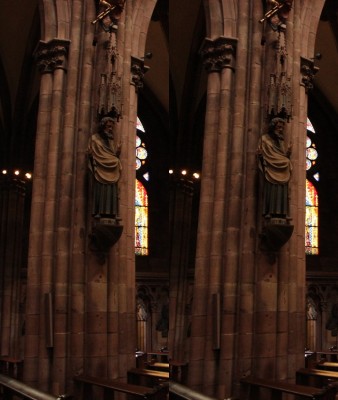
The next example shows a bent (left) and unbent (right) column:

Cropping the image in GIMP
To crop the image, you make a selection by choosing Rectangle select from the Toolbox. Then click into the image and drag to make a selection.

Once you have done that, go to Image → Crop to Selection and only the selected area remains.
You can also set the aspect ratio in the Tool Options window once you clicked on Rectangle select in the Toolbox window.
Brightness and Contrast
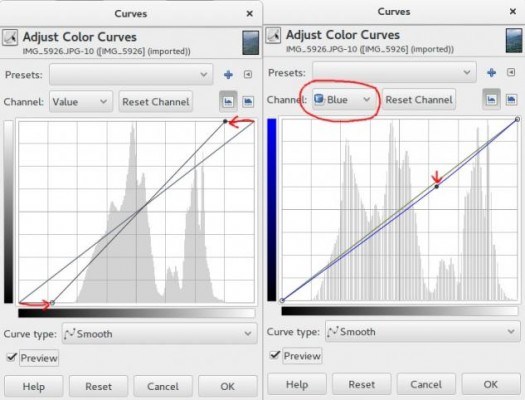
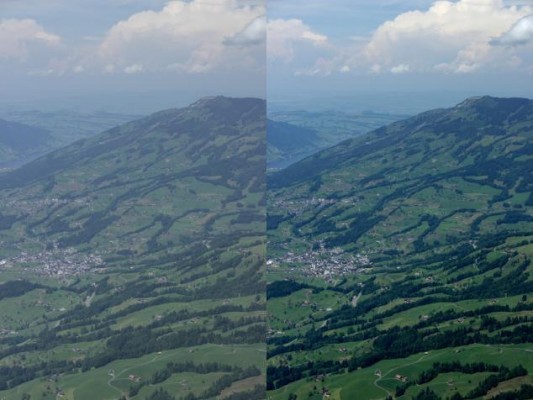
For almost any picture I edit, I first modify brightness and contrast using the GIMP histogram. Open the image in GIMP. Go to Colors → Curves where you have a window in which you can directly modify the histogram. In this example, we “dehaze” the image and then lessen the dominating blue channel. In the left picture below you see that the histogram is quite compressed which makes the image look pale and colorless. Take the upper endpoint of the curve and moved it to the right, then move the lower endpoint to the left. Finally, click OK. Move the start-/endpoints only inside the gaps between the corners and where the first values of the histogram begin, otherwise you will create artifacts. To mitigate the dominating blue channel, open the Curves window again but this time select the blue channel. Then click on the curve, hold down the mouse button and drag the curve down until the desired effect is reached.

The result can be seen here:

You can also do this with the dialogue Colors → Brightness-Contrast, but with the Curves dialogue you have much better control. If you wish to increase or decrease saturation, go to Colors → Hue-Saturation and move the Saturation slider.
It is also possible to brighten and darken only a region of the image.
Removing small objects
Images often have small imperfections like hot/black pixels or flies, birds etc. As long as they are small enough (a dozen pixels), they are easily correctable. In the Toolbox window, you will find the Clone Tool. Select it, then hold <Ctrl> and click to a place nearby the faulty spot that has the same color and texture. Then you left-click directly on the faulty spot. Now the content from the place you selected with <Ctrl>-click is copied to the current cursor position. Try it a bit, select new positions with <Ctrl>-click and adjust the radius in the Tool Options dialogue and you will soon have the hang of this tool.
Putting it together
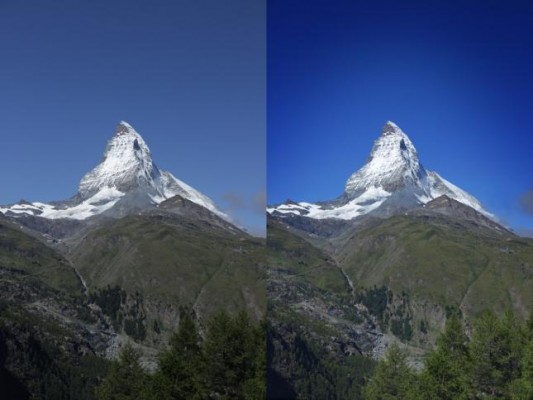
We have a picture that is slightly underexposed and pale. First, we correct the contrast (Colors → Curves) but this time only on the upper end of the curve. We leave the lower end as it is, otherwise the dark parts become too dark. Then we brighten the lower region of the image, especially the trees in the lower right corner (Doge / Burn Tool in the Toolbox). Then we increase the saturation (Colors → Hue-Saturation). Afterwards, we remove one of the clouds on the right side of the mountain and the cable car station in the left center below the mountain (Clone Tool in the Toolbox). To make the image more dramatic, we add a vignette around the top part of the mountain. Unfortunately, this is a bit too complex (see Further reading) to describe it here, but I can only encourage you to learn this technique. Once you have done it a few times, it is not a problem anymore.

General Notes to GIMP
To get a JPG image out of GIMP again, don’t just save it, export it (File → Export As...).
Sometimes you accidentally close the Toolbox, Layers or Tool-options windows. Go to Window → Dockable Dialogs and select the one you want.
Keep an eye on the Tool Options window. If tools do not work properly, it can probably be fixed by changing the settings here. In my GIMP version, for example, the Dynamics is always set to “Perspective” by default, so I have to change it back to “Basic Simple”.
General Notes to Darktable
To apply the same operation(s) on a batch of pictures in Darktable, it is possible to build a stack of tasks and then apply them to multiple selected pictures. This is very handy when you process a batch of pictures coming from a time lapse (otherwise you would edit at least hundreds of images manually!).
Further reading
One important technique is applying a vignette, especially when working with portraits. The process of achieving this is a bit complex and would be too much for this small “motivational” article. However, you can search in Google for “gimp add vignette” or similar and find some very good step-by-step tutorials.
There is also the GIMP documentation (https://www.gimp.org/docs/) which is fairly detailed. For specific tasks, I suggest searching for a tutorial or youtube-video.
If you are interested in producing HDRs, try Qtpfsgui. I would not say it is overly user-friendly but I tried it a bit and had a decent outcome twice. To use it, there is probably no way around trying different settings a lot of times.
Final Remark
That was my small tutorial. I hope you now have an impression of how some basic tasks work in GIMP/Darktable and if you do not fear using GIMP and Darktable now, I would be very happy!
You can see some of my pictures on my instagram: photographyscientist. They are all processed with open source software on Linux.
Stelle frei!
Wir suchen eine:n Werkstudent:in als stv. Supportkoordinator:in (50-60%). Mehr Details zur Stelle findest du hier. Bewirb dich jetzt oder teile die Stellenbeschreibung in deinem Bekanntenkreis!
Bestellauskunft
Du kannst den Bestellstatus deines Laptops im Kundenkonto des Vertriebspartners verfolgen. Informationen dazu findest du im FAQ.
Help Point: Bitte buche einen Termin
Unsere Supportmitarbeiter an den Help Points ETHZ, Bern vonRoll, UNIBAS und UNILU sind für dich da. Wenn du technische Unterstützung brauchst, kontaktiere uns via E-Mail, um einen Termin zu vereinbaren.
