Windows System Restore
You may have been in a situation where you downloaded and installed a program or a driver from the internet but then noticed that the installation damaged your system. If so, this blog is made for you!
The Windows System Restore tool is shipped by default with every instance of the Windows operating system. What it does is helping you recover from system malfunctions arising from failed installations or other damaging processes involved. Although you may never have heard of it or think of it as a tool only professional users need, it can nevertheless be a good idea to look at what it does and how you can profit from it.
Situations in which to consider a Windows restore
As mentioned before, System Restore can be used to recover from system failure, corrupted system files, misconfigurations or malfunctioning drivers. A good example for this is when you install a new driver for your graphics card and your screen suddenly displays strange colour patterns.
What a System Restore does
First things first: a restore is not an alternative to a backup! Contrary to a backup, a restore does not save any personal files like music, videos or documents. You can think of it more as a “backup” for your computer’s personal files, meaning the system files that keep it running.
System Restore takes a snapshot of your current system including Windows registry files, system settings, drivers and applications (.exe files) and does that by creating a so-called restore point.
Reverting to a prior restore point recreates these old system configurations and files. It also un-/installs all programs and drivers that were or were not present at the time of creation of this specific restore point. Hence, you can also think of it as a time machine for your system (not to be confused with Apple’s Time Machine feature which is for backups!).
Importantly to mention at this point is, that if your system is infected with a virus, it might not be a good idea to use this tool since viruses live deeper in your system and cannot be removed by System Restore. In this case the smarter solution would be to just reinstall Windows since all your files will be deleted and with them the virus as well.
An additional important point to note is that the restore tool is not enabled by default in Windows 10. Allocating a tiny bit of disk space for it can save you time in case something goes wrong in the future.
System Restore is hard drive specific. This means that it must be enabled for each hard drive separately but since most people only have system files on their C: drive it is not necessary for other hard drives.
Possible problems
When reverting to a prior restore point, Windows tries to un-/install all applications and drivers that were present then. These installations are not always successful and sometimes need manual un-/installation by the user afterwards.
Creating too many restore points may cram your hard drive. To circumvent this, the user can allocate a certain amount of disk space the restore points can take up. If there is not enough space left, old restore points are deleted or no more new ones are created (by default, Windows would use maximum 15% of a volume’s disk space).
Manually Creating a restore point
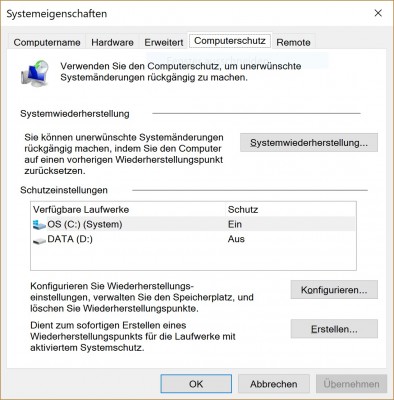
Click the Windows key on your keyboard, type “system restore” and click on “creating a restore point” (you are not yet creating one by clicking there). Alternatively, you can open the control panel and go via “System” and “create a restore point” which directs you to the same destination. In the new window you can either configure your restore settings or create a new restore point, which is what we are going to do now.

The next window prompts you to name the restore point. You can name it any way you want but be aware that the current time and date are added and stored automatically so you don’t have to include them in the name. After clicking “ok”, it takes some seconds until the restore point finally is created.
Configuration
Clicking on “Configure”, a new window pops up. Note that the following configurations are hard drive specific, which means any changes only affect the chosen hard drive.
In the upper part you can either activate or deactivate the automatic creation of restore points on this hard drive. In the middle, you can use the slider to allocate a certain portion of your disk space to restore points and on the bottom, you can erase all restore points from this hard drive.
Going back to a specific restore point
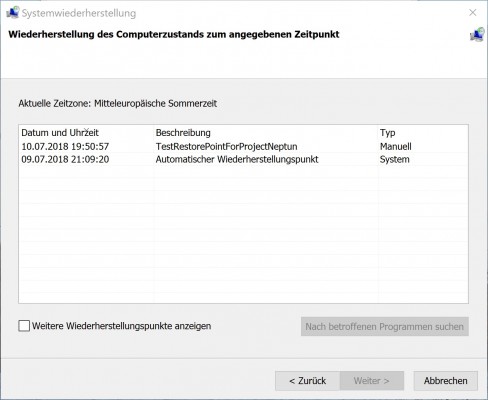
By clicking “System Restore” you are taken to the restore wizard which helps you through the following steps. In my case, I’m going to revert to the just made test restore point. You can search for programs that will be affected by reverting to a specific restore point by clicking on the according button.

Choosing your restore point and going further you must confirm your selection. It is then followed by a restart of the operating system and there it is: you reverted your system to a prior restore point!
Summary
To conclude, it really doesn’t hurt turning on System Restore. All it costs is some small percentage of your disk space. If you’re unsure whether to install something in the future just create a restore point, do the installation and possibly revert back in case something goes wrong.
https://www.tekrevue.com/how-to-enable-system-restore-windows-10/
https://www.howtogeek.com/howto/windows-vista/using-windows-vista-system-restore/
Jobs available!
We are looking for a working student as Deputy Support Coordinator (50-60%). You can find more details about the position here. Apply now or share the job description with your friends!
Order Information
You can track the order status of your laptop in our distribution partner's customer account. You can find information on this in the FAQ.
Help Point : Please book an appointment
Our support staff at the Help Points ETHZ, Bern vonRoll, UNIBAS and UNILU are there for you. If you need technical support, contact us via email to make an appointment.
